

Hello and welcome, I have a lot of cards for you today using the products from the latest Spellbinders release called Yana's Amaryllis Christmas. I will be sharing these over the next few days on my social media, but have them all here in one place for you to check out how I made each one.
Supplies: https://ldli.co/e/kqzj970
The first card above was made by cutting the "Yana's Amaryllis" die from white and gold mirror card stock. I colored the white one with colored pencils, then laid the gold outline over the white colored one. I added a solid gold one behind it for more dimension. Next I added the gold leaves and sentiment which was made with the BetterPress plate called "Home for Christmas Sentiments" from the same collection. Lastly I added gold pearls around the card.
Card #2
Now for the next 5 cards I used an new BetterPress plate from the collection called "Festive Poinsettias."
I used the plate in different ways:
This card below was made using Hero Arts Raspberry Ink on the plate, and using grey letter press paper which is made specifically for the BetterPress machine. Once dried, I cut a triangle from the bottom panel so I could add a BetterPress sentiment from the same sentiment set as card 1. In fact all but one of my cards use the same sentiment set. Here's card 1 with the BetterPress plate:

This card below was made using Hero Arts Raspberry Ink on the plate, and using grey letter press paper which is made specifically for the BetterPress machine. Once dried, I cut a triangle from the bottom panel so I could add a BetterPress sentiment from the same sentiment set as card 1. In fact all but one of my cards use the same sentiment set. Here's card 1 with the BetterPress plate:

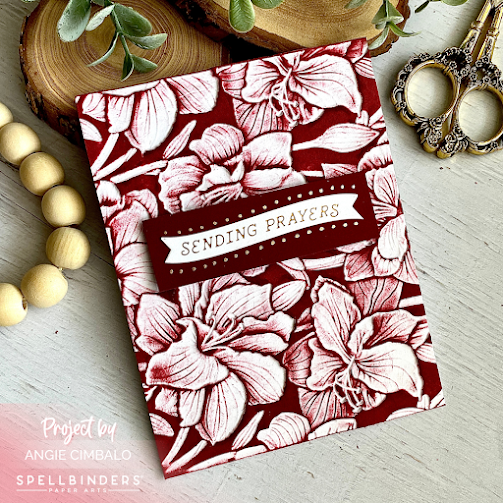
Card #3 below, was mde with the BetterPress plate was made with black BetterPress Ink, same sentiment set plus some gold pearls:

Card #4 below, was made with the plate just as I did card 2 - PLUS I used the coordinating stencils to ink the white areas of the panel with Distress Inks. Next I added the sentiment framed with a piece of inked cardstock in pink. Lastly, I added white gel pen and Glossy Accents to the berries and flower centers.

Card #5 was made by using the BetterPress plate as an embossing plate in my Spellbinders Platinum 6 machine. (I used the bottom plate, the BetterPress plate facing up toward my paper, the rubber embossing mat and a top plate. Just be sure to check your own sandwich for your particular machine can run it through easily enough so that your sandwich doesn't get stuck in your machine.)
Once I ran it through I added Surf Blue ink from Simon Says Stamp to the top, cut a red banner to add the sentiment to and added Autumn Red Nuvo drops to the berries.

Card #6 was made just like the blue one above, except with red ink. I cut the panel on the diagonal and then sliced a 3/4" slice from the center and then added the two triangles to the card base. I added a little white gel pen and then added the sentiment from the same set.

The next 3 cards were made with the new 3D embossing folder from the same collection called Amaryllis Garden.
Card #7 was made by running a 5.5" by 8.5" panel through the new 3D embossing folder, then inked on the debossed side with red ink. Once dried, I cut it into 2 panels to use on 2 separate cards. This first one uses a red frame for the panel and a red rectangle to place the sentiment on. Lastly I added gold paint pen dots arount the card.


Card #8 Below I used the black out method which is:
Color with ink blenders, on the debossed side, the flowers, leaves with different colors. Once dried add black ink pad direct to paper and then the magic happens! I added a sentiment from the same set.

Card #9 uses the left over panel from card #7 and this is the only one I didn't use the new sentiment set on. Instead I used the "Curved Everyday Sentiments" glimmer plate and die set. I also added gold paint pen.
I hope you enjoyed my many cards today using this beautiful new release designed by Yana Smakula for Spellbinders. With it you can create so many gorgeous cards!

I hope you enjoyed my many cards today using this beautiful new release designed by Yana Smakula for Spellbinders. With it you can create so many gorgeous cards!
I have affiliate links below that you can use to shop for the products I used at no extra cost to you.
Thanks so much for stopping by!
Your cards are all so gorgeous!
ReplyDeleteAll are so beautiful Angie. You really are very talented.
ReplyDelete