

Hello and welcome! I have a fun mini slimline card made with the cutest products from Photoplay Paper "Say it With Stamps!" Here's a list of the products I used, and they are all linked at the bottom of this post in case you are interested in purchasing them.
Be sure to sign up at the Photoplay Paper website to receive emails where you will receive PDF's of projects like these from our design team!
SIS PRODUCTS USED:
Mini mice stamp and die set
Bright paper pad 6”x6”
Clouds Stencil
Borders die
#6 Blank Card Stock
Steps:
1) Stamp all images and the "Have a Mice Day” sentiment from the “Mini Mice” stamp set in black ink. If you prefer you can also heat emboss them in clear embossing powder.
2) Die cut the images with the coordinating “Mini Mice” die set
3) Today, I'll be showing you how to color with a combination of alcohol markers and colored pencils to get a unique look. I'll show you the technique on the face of this cute balloon carrying mouse. First color the images with alcohol markers.
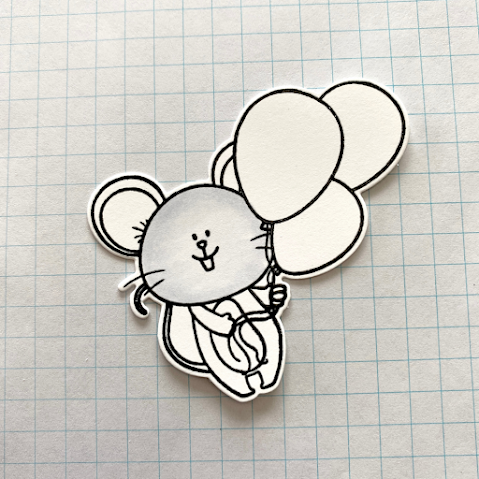
4) Add black colored pencil lightly around the black edges of his face then blend inward with a medium dark gray pencil.

5) Now using a lighter gray pencil start from the darkest color and blend lightly inward,

6) Lastly use a white pencil to highlight the center of the face, blending from the lightest gray pencil toward the center.

7) Color the balloons with 2 yellow, 2 blue and 2 pink alcohol markers, picking one slightly darker than the other. Color the balloons darker on the left side with the 2 alcohol markers.

8) Now do the same dark to light coloring with 3 colored pencils in colors of each of the balloons. Keep the darkest pencil color on the left side, blending lighter as you go to the right side of the balloon.

9) Complete these coloring steps for all the images. You can always add a little light black pencil in the darkest area and white pencil in the lightest area to make it have more depth.
10) Using the “Border Dies” cut a borders from “Bright 6”x6” pad in pink, double sided dotted paper - below you can see the larger dot side - I used the other side with the smaller dots.

11) Cut 2 more borders, one in yellow and one in blue to add to a “#6 Blank Card Stock” card base.

12) With an ink blender, blue ink, and the “Clouds Stencil” add some clouds on the top ¾ of the card base.

13) Glue the borders on the bottom of the “#6 Blank Card Stock,” card stock in the desired pattern. Make sure you leave the center of the borders open for the mice to fit in.
14) Cut off excess border on the sides with scissors. Add the images with glue, and pop the top mouse up on foam tape.

15) Cut the sentiment into a banner add to card with foam tape and add the tiny flower on the sentiment and the extra piece of cheese under the bottom border
16) Add a few embellishments on the card front, I used tiny pink, blue and white hearts.
Here’s a few more views of the card:


I hope you like my sweet little card full of the cutest mice ever! Let me know what you think in the comments below. Affiliate links are available below and no extra cost to you.
Thanks for stopping by!
I have used affiliate links in my post, what does this mean? If you click on the blue links, not the photos, below and shop from them, I will receive a small commission from the sale which is no additional cost to you but compensates me for using the product and my time. Thanks so much!
 SIS Mini Mice Shop at: SSS | SC |
 SIS Mini Mice Die Shop at: SSS | SC |
 SIS Borders Dies Shop at: SSS | SC |
 SIS Clouds Stencil Shop at: SSS | SC |
 SIS Brights Dots & Stripes Shop at: SSS | SC |
 SIS #6 Blank Card Bases Shop at: BO |
 SC Dome Ink Blenders Shop at: SC |
 Ohuhu Pastel Markers Shop at: OH |
 Ohuhu Brush Alcohol Markers Shop at: OH |
 Spellbinders Platinum Shop at: SSS | SC |
 Prismacolor Sharpener Shop at: SC |
 Prismacolor Pencils Shop at: SSS | SC |
 Misti Stamping Tool Shop at: SSS |
 Fiskars 9" Trimmer Shop at: SC |
 SSS Assorted Cardstock Shop at: SSS |
 WW thin Foam Tape Shop at: SC |
 TH Glass Media Mat Shop at: SSS |
 Nuvo Deluxe Glue Shop at: SSS |
 Heat Tool Shop at: SSS | SC |
 CE Anti Static Pad Shop at: SC |
 CS EP Trio Shop at: SC |
 Versafine Clair Nocturne Ink Shop at: SSS | SC |
 Fiskar Spring Scissors Shop at: SSS | SC |
This is a sweet card, Angie. I love the look you got coloring the balloons.
ReplyDeleteThese little mice are so cute and the papers and colour choices are lovely too.
ReplyDelete